How to Turn On AirPlay Display on Mac
AirPlay is a convenient feature that allows you to wirelessly stream content from your Mac to an AirPlay-enabled device such as an Apple TV, HomePod, or certain smart TVs. It enables you to mirror your Mac’s screen or play media on a larger display effortlessly. If you want to turn on AirPlay display on your Mac, follow the step-by-step guide below.
Step 1: Ensure Compatibility
Before attempting to turn on AirPlay display, make sure your Mac is compatible with AirPlay. Generally, Macs that are running macOS Mountain Lion (10.8) or later support AirPlay Mirroring. Additionally, both your Mac and the target device (e.g., Apple TV) should be connected to the same Wi-Fi network.
Step 2: Access System Preferences
Click on the Apple menu () located in the top left corner of your Mac’s screen and select “System Preferences” from the dropdown menu. Alternatively, you can access System Preferences through the Launchpad or the Dock.
Step 3: Open Display Preferences
In the System Preferences window, locate and click on the “Displays” icon. This will open the Display Preferences panel, which allows you to adjust settings related to your Mac’s display.
Step 4: Enable AirPlay Display
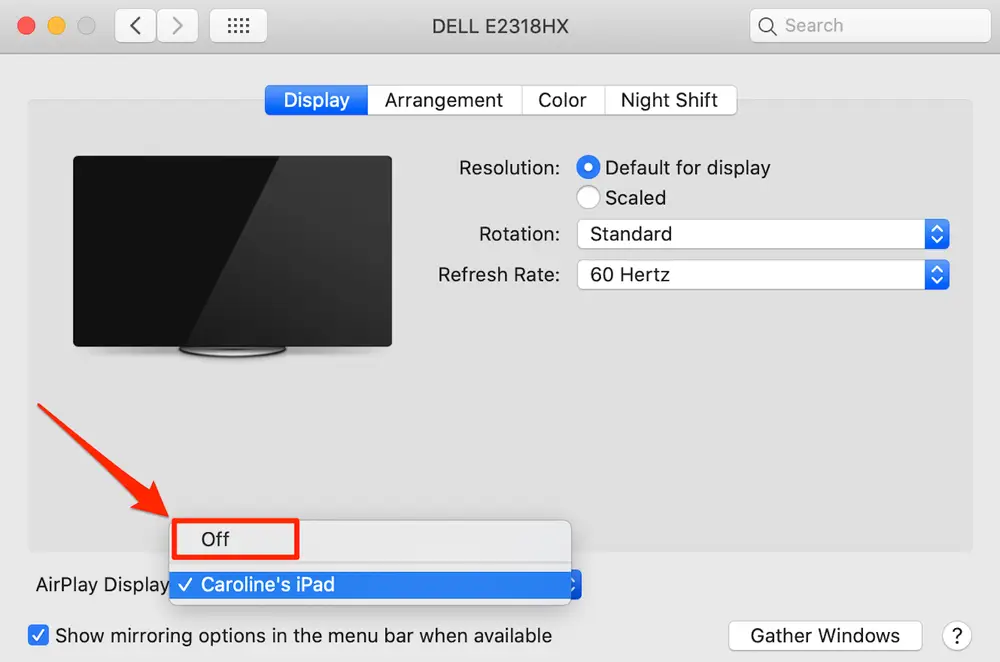
Within the Display Preferences panel, you should see a tab labeled “AirPlay.” Click on it to access the AirPlay settings.
Step 5: Select AirPlay Device
In the AirPlay tab, you will see a list of available AirPlay-enabled devices that your Mac can connect to. Choose the device you want to use as your AirPlay display by clicking on its name. If the desired device does not appear in the list, ensure that it is properly set up and connected to the same Wi-Fi network as your Mac.
Step 6: Adjust Display Settings (Optional)
Once you’ve selected the AirPlay device, you can adjust the display settings to your preference. You can choose whether to mirror your Mac’s screen or use the AirPlay device as an extended desktop. Additionally, you can adjust the screen resolution and brightness of the AirPlay display.
Step 7: Enable Audio (Optional)
If you want to play audio from your Mac through the AirPlay device, ensure that the “Play sound effects through the selected device” checkbox is ticked in the AirPlay settings. This will route audio output to the AirPlay-enabled device.
Step 8: Start AirPlay Display
After selecting the desired AirPlay device and adjusting the settings, you are ready to start using the AirPlay display. Simply click the “Show mirroring options in the menu bar when available” checkbox located at the bottom of the AirPlay settings to add the AirPlay icon to your menu bar.
Step 9: Utilize AirPlay Display
With the AirPlay icon now visible in the menu bar, you can easily access AirPlay display options by clicking on the icon and selecting the AirPlay device you want to use. This allows you to quickly toggle between different AirPlay devices or disconnect from AirPlay when you’re done.
AirPlay display provides a convenient way to share your Mac’s screen or enjoy media on a larger display without the need for cables or adapters. By following the steps outlined above, you can easily turn on AirPlay display on your Mac and take advantage of this wireless streaming feature. Whether you’re giving a presentation, watching a movie, or playing games, the AirPlay display enhances your viewing experience and promotes flexibility in how you use your Mac.
Read More: How to Change Your Airdrop Name
Turn on AirPlay to Stream Audio From Your Mac
If you want to stream audio from your Mac to an AirPlay-enabled device, such as an Apple TV, HomePod, or compatible speakers, you can follow these steps to turn on AirPlay:
Step 1: Check Compatibility
Ensure that your Mac and the AirPlay-enabled device are connected to the same Wi-Fi network. Additionally, verify that your Mac supports AirPlay. Generally, Macs running macOS Mountain Lion (10.8) or later are compatible with AirPlay.
Step 2: Access the Sound Preferences
Click on the Apple menu () located in the top left corner of your Mac’s screen, and select “System Preferences” from the dropdown menu. In the System Preferences window, locate and click on the “Sound” icon. This will open the Sound preferences panel.
Step 3: Choose the Output Device
In the Sound preferences panel, navigate to the “Output” tab. Here, you’ll see a list of available audio output devices. Look for your AirPlay-enabled device in the list, and click on its name to select it as the output device.
Step 4: Adjust Sound Settings (Optional)
Once you’ve selected the AirPlay-enabled device as the output, you can adjust the sound settings to your liking. You can control the output volume, balance, and other audio options from this panel.
Step 5: Play Audio
With AirPlay enabled and the appropriate device selected, you can now play audio on your Mac, and it will be streamed to the AirPlay-enabled device. Whether you’re listening to music, watching videos, or any other audio playback, it will be transmitted wirelessly to the selected device.
Step 6: Manage AirPlay Devices (Optional)
If you want to manage your AirPlay devices more conveniently, you can add the AirPlay icon to your menu bar. To do this, go back to the Sound Preferences panel and select the “Output” tab. Check the box that says “Show volume in the menu bar.” This will display the volume icon in the menu bar, which you can click to access AirPlay options and switch between devices easily.
By following these steps, you can turn on AirPlay on your Mac and start streaming audio to your preferred AirPlay-enabled device. Whether you want to enjoy music throughout your home, create a surround sound experience, or simply stream audio to a more powerful speaker system, AirPlay provides a wireless and convenient solution for streaming audio from your Mac.